December 28, 2009

Russian Tank Riders

Well my quest to make a record of all the figures and tanks I have done over the years continues . . .

This is another set of figures I painted up for Milicast and are photographed by Tom.

A nice little set of figures for sitting on 1/72 and 1/76 scale Russian Tanks.

I used a lot of different shades of khaki and browns to make the uniforms stand out from each other (I know you can't really tell from the picture).

I believe this set is FIG052 and can be bought direct from Milicast in the UK.

December 21, 2009

Merry Christmas

I know it is a bit early and I had planned to do a load more posts and have a lot of pics sitting waiting for uploading but I have been busy with our club and my napoleonic blog so to finish off the year here is a little fun santa I have been working on.
  
The figure is a Warhammer Fantasy zombie converted with with Milliput. I slammed it together pretty fast for a zombie project Stuart and I are working on at the club.
  
  
You better go run
You better go hide
You better not shout
 I'm telling you why!
Zombie Claus is coming to town!
  
He'll eat you when your sleeping
He'll eat you if your awake
He'll eat you if you've been bad or good
so go hide for goodness sake!
  
  
So have a wonderful Merry Christmas and a Happy New Year and I hope everyone gets all the figures and kits they want!
  
Happy Modelling and Wargaming!!
  
  
And see you all next year . . .

November 08, 2009

Halloween Zombie Fun

For Halloween this year we decided to have a little fun, zombie fun!
 
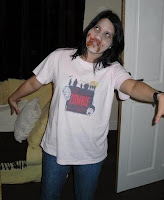
 As the zombie woman catches a glimpse of herself in the mirror what is she thinking? Is she having flashbacks to a time when she was alive? X factor, Strictly Come Dancing, Britain's Got Talent, Banking Crisis, Wars and Corrupt Politicians . . .
  
Is it so bad being a Zombie? Better Zed than Dead!
 
 Since I was a teenager I have been a big fan of zombie films and with all the new ones in the past years and soon to be released what better to be at Halloween than Zeds . . .
  
 I feel my body lends itself well to becoming a zombie, out of shape and carrying a few extra pounds.
 
You too can achieve a zombie physic all you have to do is eat loads of take away meals, drink beer and wine, eat lots of sweets and do no exercise for a couple of years.
   
You have no idea how amazing it is that my wife let me show these pictures. My wife is a Filipina and from the age of 6 months has been striking a pose as soon as she hears a camera click! For my wife to show herself looking anything than at her best is a big deal so good on you Mai!!
  
Me, I don't mind how I look in photo's, My beauty years are well past me and most mornings I pretty much look like a zombie anyway.
  
The zombie wife searches aimlessly for her Doritos and white wine.
 
Special Effects: Talc, eye liner and tomato sauce (Heinz works best!).
  
And this is how we look normally . . . Ahhhhhhhhhhhhhhhh! Scary?
  
Can you believe we only got 2 small groups of trick or treaters at the start of the night and we had bought in a load of sweets and apples too since we had load of kids come round last year.

October 07, 2009

Hanschar from Milicast

This is another set of figures from the milicast range I did for Tom

There is loads of detail on these guys to paint and I managed to pick out the medals and ribbons etc.

They are a very unusual subject that I dont think have been covered by any other companies. I really enjoyed painting these guys.

October 03, 2009

Brush Painted WW2 Camo

I wrote this guide for painting WW2 German vehicle soft edge camouflage a few years ago when I didn't have an airbrush. I now own an airbrush but I think it will still be of some help to modellers who don't have 1 yet.

I would guess a good many modellers still haven't got an airbrush to their name and this can cause a bit of a problem when trying to create a realistic 3 tone late war German panzer camouflage that was applied in the field by the troops with an airbrush. So here is my simple solution that I stumbled upon a few years back. (it's best to use enamels for this)


STEP 1 Always keep your old brushes, I trim mine down to varying shapes and sizes, have your brush cleaning fluid (turps, white spirit etc) in a small easy to handle glass container sitting close by (work in a well ventilated room).

STEP 2 Base coat your vehicle in your chosen colour (I use Humbrol dark yellow 94). This should be left to dry for 1-2 nights. Also you should have a good idea of what camo scheme your looking for.

STEP 3 : Your now ready to apply your second colour, it is up to you what colour you start to apply next either red, brown or green.

After mixing the paint well I paint on a couple of sections of the second colour with a normal brush and then I switch to 1 of my old trimmed brushes first dipping it in the cleaning fluid to get it damp then I dry off the excess liquid on an old rag. Then I gently begin to smudge the edges of the newly painted colour and this begins to give a nice feathered texture to the paint finish (smudging with different brushes produces harder and softer effects). It will take a few nights to do the 2nd and 3rd colours and it's best to limit the amount of sections you do in each painting session.

CONCLUSION Hopefully with a bit of time spent you should end up with a more natural looking 3 tone camo with an airbrush finish. Unfortunately this will not replicate totally the excellent effects achieved by using a high quality airbrush but it's worth a try.

September 30, 2009

Riders of Rohan

As a young lad along with my friends at school I had been into Dungeons and Dragons (I really just enjoyed painting the figures to be honest) so when the Lord of the Rings films came out and figures were released it was obvious that this would be another painting avenue my brother and I would follow.

Surprisingly we were quite slow to pick up the figures at 1st. I guess this must have been because my nephews were still small? Just as well as they were and still are pretty expensive if you want to build an army. However we soon made up for it! Ebay is a wonderful thing to spend your money on.


We bought up badly painted figures and large lots by the ton then striped them back to their original state and before we knew it we had quite a sizeable collection to paint up. (The Riders of Rohan are just a small part of our collection and we have around sixty of them, 40 are completed so far).

As we have so many of them I thought it would be a nice idea to convert some of them to give our units a fresh look. I sanded down helmet rims, altered arms and changed weapons. We managed to get some flags printed out too. I stopped short of finishing the bases and tidying up the banners but I am sure I will get round to that. We will be having some really big battles with these guys as my brother David has picked up 3 Mumaks to fight! 2 are finished!!

September 29, 2009

Figure Painting Guide

I created a version of this guide a few years ago for my old website when some friends asked me how I go about painting figures. So I thought it would be a nice idea to rejuvenate it for this blog.

I first became aware of figure painting as a young lad watching over my older brothers shoulder as he painted boxes of Airfix figures and I guess soon after I covered my own figures in many layers of multicoloured paint. Over the last 20 odd years I have painted everything from English and American Civil War, Napoleonic, Roman, Dragons, Elves and Skeletons from 15mm to 1/35 scale.

I usually prepare 2 or 3 figures at a time unless painting character figures. Once I've decided on which figures I will be painting 1st thing I do is wash them in cold water with soapy liquid to get rid of any casting agent/chemicals that may remain around the figures then I leave them to dry. Next I will cut and file off any casting blocks or flash and fill any imperfections with milliput or glue depending on the size. Once prepared I glue the figures to little bases of old model box card for easier handling while painting.


PAINTS Mostly I use acrylics but make use of both acrylics and enamels of various makes. I have no particular favourite but you can finish figures much faster with acrylics.

STAGE 1 : PRIMING THE FIGURE Patience is the key to figure painting, first the I prime the figures with a coat of light grey. This acts as a good base for any following coats and brings out detail and any imperfections I've missed. Then I leave the figures to dry for a time depending on what type of paints I've used.

STAGE 2 : BLOCKING IN THE MAIN COLOUR I work from dark to light when figure painting and I tend not to use black neat on a figure unless with panzer uniforms or the base for very small details.

So I start off blocking out areas of uniform with a darker shade than I am aiming for (dark drowns, dark greens and dark reds). I then block out the flesh area using the same method but using a blend of browns and blue and flesh but I make sure I don't go to dark as the paint job can then become a wargames look.

STAGE 3 : PAINTING FACIAL DETAIL I then paint in the eyes with white then Prussian blue, I do this before finally shading the face. Painting the eyes before painting facial features lets you blend them into the face as you begin adding in facial detail. I do this by using a very fine brush to apply subtle shades of the base colours mixed with flesh to prominent areas such as nose, cheeks and ears then gently continue adding a little white until I am happy with the result. I also paint the rims of helmets or hat at this stage. (I do the face 1st as once complete I find it spirits me on to finish a figure well)

STAGE 4 : UNIFORM PAINTING There is no secret in my uniform painting just the same working from dark to light and I leave all small detail till later and treat all webbing and weapons as individuals leaving metals till later too. I also leave headgear till later as I have a tendency to hold the heads with my index figure.

STAGE 5 : PAINTING IN UNIFORM DETAIL I use black neat to pick out buttons, belt buckles, medals and unit insignia then it's down to a steady hand to paint the items in their actual colour and then I finish off headgear and metal objects (this is the points I feel really completes a figure). Then finally I varnish the figure in Revell matt Varnish and I'm done.
So that's my simple method of painting figures and definitely is not the only way but it gives me my best results. (Hopefully it will be of some help to someone else).
Happy Figure Painting !!!

When I am painting figures I try to gather as much reference material on the uniforms as possible, being able to see what your aiming for definately makes life much easier. All the figures shown in this article are from the Milicast range of 1/76 scale resin figures and are sculpted by Tony Boustead of England. Tony's figures are some of the best around for the smallscale modeller at the moment and can be found in many figure ranges such as Milicast, FCM and SHQ.

September 18, 2009

Milicast British WW2

I done these figures for Tom at Milicast a number of years ago and was pretty pleased with the finish. They were painted with various types of acrylics and then varnished with Revell matt. I have had a very long break from doing 1/72 scale kits and because of this have seen no point in painting WW2 figures.


I really like the Milicast figures, they are listed as 1/76 scale but fit in great with 1/72 scale vehicles. I am itching to get back into building WW2 armour again but unfortunately I have no space in my wee house to work on them. I'm hoping that over the next year or 2 I will have my loft converted so I will have somewhere to set up my paints and build kits again.

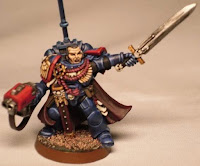
Ultramarines Officer

I done this guy for my nephew Davids Ultramarines army. I think my brother picked him up in a lot from ebay and decided to change the right arm. I'm quite happy with the way he turned out.

September 14, 2009

Cromwell Swimming

The Cromwell is from Revell with wading gear from MR Modelbau (It's been a while since I did this one but I believe that the wading gear was part of the centaur conversion set?) Some of the stowage was from MR Modelbau with additional stowage from the spares box. I used milliput to represent the areas protected from the sea.

Figures are from Milicast and different grades of wire was used to make the earphones, antenna and wading attachment.
To acheive the water effect I poured clear resin in different layers mixing in enamel blue/brown/green to get a dull water look and stipled a light grey into certain points to get the froth effect.

Centaur 1/72 scale

This is a Revell Cromwell converted to represent a Centaur used by the Royal Marine Support Group at the time of the normandy landings. They were used to provide artillery support to the troops during the initial stage of the assaults and were not supposed to proceed beyond the coast however some did advance inland up to 10 miles. The little numbers marked on the outside of the turret were to help direction the fire and was first penciled on then hand painted.


I added additional little details of my own and the figures are from Milicast with a little bit of conversion work. Different grades of wire was used for the antenna and head phones. I worked from pictures of the actual vehicles and I really enjoyed doing this one and feel it turned out pretty well. I took the colours of the uniforms and berets from fellow modellers advice but I believe that the current thinking is that the tankers would have been in the usual uniform of khaki with black berets.

Black Templars 40K

Probably like most guys my age (3o something) I grew up painting and playing with space marines. My friends and I got stuck right into Space Hulk and the new 40K figures were a revelation for us but through time I drifted away from these little guys. Fast forward 15 plus years and my nephews start buying these little dudes. The gear is a little different and the detail is a lot better but all in all they are the same chaps I collected as a boy and their enemies are beginning to look really cool too.

So what do you do? Well you go online and start buying the little critters all over again and before you know it you have boxes of the little devils armed to the teeth. Add to the recipe an older brother who is more into them than you are and you have a teenage obsession all over again.

So I decided this time around I wanted an army a little cooler than the blue guys with the U on their shoulders and went for the coolest of the cool, the men in black. This will be an ongoing project that I will slowly build on inbetween my main projects.

My first set of double hard bro's finished with the markings of the ork battles. Just a bit of fun to start me off.

15mm Zouaves

Here are some of my brothers ACW figures

David started playing Johnny Reb II a couple of years a go when some of the guys at the Motherwell wargames club we attend brought out some really nice looking figures.

And that was it David was hooked and has been building up pretty large armies of both Union and Rebs.
This is a battalion of Zouaves from Old Glory he has not that long finished and I think are really nice.

September 08, 2009

Perry Samurai

A friend from the Motherwell wargames club had these little guys in with him and I couldn't resist having a go at them.
 
I have since found out they are from Perry Miniatures. I started off with 28mm napoleonic's years ago but haven't really done any figure painting bigger than 20mm for years so I thought it was about time that I broaden my horizons again.
   
I have always found Japanese history very interesting if not pretty chaotic and have been looking for a reason for years to have a search about for more info on the country and it's violent past and what better way than some Samurai!

May 06, 2009

Welcome note

So here goes, my first effort at posting a blog

For as long as I can remember my brother David and I have been build and painting kits and figures of all different scales and types (WW2 in 15mm and 20mm, naps, ACW, Samurai, Lord of the Rings, 40K) you get the picture. Over the past couple of years we have been joined in our collecting by my nephews. We had a dip in collecting for a few years until we started to attend a couple of local wargames clubs (Motherwell and Carluke) and we caught the bug again.

The reason for this blog is to record some of what we have been doing over the years just incase there is a big fire and all the little figures turn to blobs of plastic and metal.

Followers